
 |
| Tom Patterson - shadedrelief.com |
Which one should I download?
Download the Bryce Canyon Style:

Setup your project / map:
- Create a new ArcGIS Pro project, or add a new map to an existing project. I have multiple maps that I created for this series, and [SPOILERS] I have some things I'm working on for some future content focused around raster tile caching in Pro; so I just used the Insert tab, and click New Map.
- You should now have a new Map View Tab open named Map. Remove the default basemaps that are automagically added to the map. Hold down CTRL and left click on both layers in the Table of Contents (TOC), then right-click one of the layers, and select Remove.

- Locate the .stylx file you downloaded, and move that file into the Pro project home folder. Right click on the BryceCanyon style, and select Add Style.

- Confirm the style is now added to your project. Expand the Styles project directory, and you should see the BryceCanyon in the list.

- Locate the DEM you downloaded, and move that somewhere in the ArcGIS Pro project Home directory.

- Right click on the Bryce_Canyon.asc raster dataset in the Catalog Pane, and select Add to Current Map from the context menu.

- Right click on the Map Frame in the TOC, select Properties from the context menu.

- The Map Properties: Map dialog should now be open. Select the Coordinate Systems tab. Confirm the Current XY coordinate system is set to "UTM_Zone_12_Northern_Hemisphere". If not, expand the Layers folder, and left-click on the Bryce_Canyon.asc layer. Click OK to close the Map Properties dialog.


Just a quick note if you're new to ArcGIS Pro, you'll quickly notice the ribbon interface is constantly updating to present you with contextual tabs based on the layers you select in the TOC of the active Map View Tab. Different layers will give you different options. A vector layer (point, line, polygon, etc) will have different Tabs and Tab Groups than say a raster dataset.
Vector Layer:

Raster Layer:

With this new found knowledge press on!
- Select the Bryce_Canyon.asc layer in the TOC, and open the Symbology Pane by clicking the Raster Layer Tab, then click the Appearance Tab, then click the Symbology button.

- The Symbology Pane should now be open. Click the Color Scheme drop-down, and select the "Bryce Canyon" color ramp. Place a check in the Invert option.

- Make sure the Stretch Type is set to "Minimum Maximum". Open the Histogram properties by clicking the small graph looking button. I know...I know. This looks intimidating, but we're only going to tweak the two sliders at the bottom of that gnarly looking graph thingy. It'll be over soon, don't worry.


- Double-click on the Minimum slider text labeled "2099.14". Type in a new value of "2100" and press the Enter key on your keyboard to commit this change. Repeat this process for the Maximum value, and change the value to "2400".

- Go back to the Symbology properties by clicking the small back arrow button. Deep breath...you made it! Congratulations :)

- Now is probably as good a time as any to save your progress. Use the keyboard shortcut / hotkey CTRL+S to save your project.
We're about to get a little deeper into Pro than most folks dare. But fear not dear readers, fear not. There's lots of wordy documentation that can help make sense of these cryptic things we're about to bend to our will. These mystical artifacts known as Raster Functions, as my video tutorial (have you watched that yet?) lays out are pretty powerful tools to have in your cartographic arsenal.
- Switch back to the Catalog Pane from the Symbology Pane. You'll thank me later, lest you want to constantly dismiss "build histogram" messages for the layers you're about to create. I have these panes all stacked up (docked) on the right hand side of my map. That's just what works for me, you don't have to use this layout. It's your project, use what works for you :)

- In the ribbon, click on the Imagery Tab, then click on the Raster Functions button to open the Raster Functions Pane. In the search bar, type "Hillshade".

- Click on the Hillshade raster function. Select the "Bryce_Canyon.asc" from the Raster layer dropdown. Select "Multidirectional" for Hillshade Type. Set Z Factor (Vertical Exaggeration) to "1.5". Click Create new Layer.

- This should add a new hillshade version of the terrain to the top of the TOC.

- Select the Hillshade_Bryce_Canyon.asc layer in the TOC. With your mouse over the selected layer, Hold down CTRL and left click and drag a copy of the layer underneath color ramp DEM layer.

- Give your project another Save. Just because you know...software.
Layer blend mode magic time:
- Select the top hillshade layer, and select the Raster Layer Tab, Appearance Tab, and under Layer Blend choose "Luminosity".

- Select the color ram DEM layer, and you should already see the Layer Blend mode in the Effects Tab Group. Choose the "Overlay" Blend Mode.

- Just take a moment and appreciate A) how easy that was, and B) how cool some simple Layer Blend modes can stack up in interesting ways. Oh, and save your project ;)
Layout Setup and Export:
- We need a new layout. Click on the Insert Tab, New Layout button. Way down at the bottom of that Layout Gallery selection, you'll see a Custom page size... option. Click that.
- In the Layout Properties dialog that opens, create a 6 inch by 6 inch page under the Page Setup tab. Click OK.

- This will add an aptly named "Layout" um...layout to your...um...Layouts project directory in the Catalog pane. We <3 layouts so this is ok. Yes you can rename them.

- You've also been magically transported to a new Layout View Tab.
- Expand the Maps project directory in the Catalog pane. Select your map, and drag it onto the layout page.

- In the Layout TOC, right click on the Map Frame, and select Properties. This should open up a new dockable pane called Element.

- Click on the Placement tab. Change the Width and Height to 6 inches. Change the Position X and Y to 0 inches.

- Change the map scale to "24,500". Left click in the scale, and highlight the current value, then enter the new value of "24,500" and click Enter on your keyboard.

- Click the Insert Tab, and in the Graphics and Text Tab Group select the Straight Text (plain "A") from the gallery. Left click on the map near the top.

- Select the new Text element in the Layout TOC. In the ribbon, select the Text Tab, then select the Format Tab. In the Text Symbol Tab Group, choose a font. The default is Tahoma. Don't stick with the defaults. Experiment and see what fonts speak to you.

- Double click on the text on the map. This will highlight the text and you are free to start typing. Type "Bryce Canyon".

- Select the Text layer in the Layout TOC, and in the Element pane, select the Text tab, then the Placement tab. Set the Width to 6 inches, and drag the text so it snaps into place along the top and side edges of the map.

- Switch over to the Text Symbol tab, click on the General tab ("A" with a paint brush), and expand the Appearance group. Across from Text fill symbol, click the drop down menu and select More polygon symbol...

- This will pop open a style gallery where you should see a "BryceCanyon" style group, and a single Polygon Fill style named "Layout Text Polygon Fill". Click on that one, then click OK to dismiss the style gallery. Click Apply to commit the changes to the text in your map.

- The Text layer in the Layout TOC should still be selected. With your cursor over that layer, hold down CTRL and left click and drag to make a copy the text layer.

- In the Layout, reposition this copy of the text to bottom of the map.
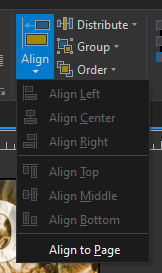
- Double click on this text in the map, and type "National Park". With this updated text still selected, in the ribbon click the Text Tab, then Format Tab, and in the Arrange Tab Group, click the Align button, and select "Align to Page".
- Click the Align button again, and choose "Align Center"

- Save your project. Then click on the Share Tab in the ribbon. In the Export Tab Group, click the Green Arrow to export the Layout.

- This opens the Export pane. Under File Type, choose "PNG", pick a destination, and Resolution. When you're satisfied with your settings, click the Export button at the bottom.


Comments
Post a Comment